Here are the pictures! ^^ We did a little photoshoot last Sunday.

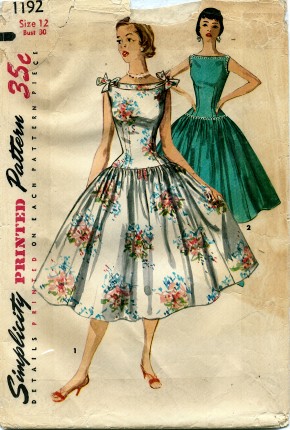
This dress was quite a challenge! First, because I had a firm deadline for it. That’s not a good idea. When you start you’re very confident, thinking you have plenty of time, and then things happen, you realize you have to make a lot of alterations to the pattern, and suddenly you’re late. Because the bad joke was that the pattern is too big! Seems it’s not my size after all. I see several possible reasons: converting my measurements from cms to inches, matching with the closest (but not exact) measurements on the pattern sheet, choosing a vintage pattern rather than a modern one… And now the result is here: it’s too big, and I got several patterns in the same size! Gertie wrote a post on finding the good vintage pattern size (which I saw afterwards…), in which she suggests you use your high bust measurement and not your regular bust measurement. Anyway next time I’ll order one size smaller!

So in the end a lot of changes had to be made: I took in a few cms in the middle of the back and front pieces, at the sides, at the shoulder seams of the yoke… Because of that I had to redraw the armhole, and with no notions of pattern altering it was a little scary. I made a musling of the Simplicity pattern (top of the dress), which seemed okay, but in the end I find that my dress is a tad too big. The waist and hips could be more fitted. I wonder if I did something wrong or if the fit could have been changed by adding the skirt. I saw in another vintage pattern (for a real dress) that they add a grosgrain ribbon as a waist stay, I’ll try that and see if it’s better. Another alteration I did was to change slightly the placement of the side zipper: it’s supposed to be at the bottom of the blouse, but for a dress I thought it would be better to have it at the top, just under the arm. The last thing that happened, which I hadn’t planned, was with the armhole. They say to finish it with bias tape, but it was just impossible for me! I couldn’t turn it around. I had to draw and add shaped facings instead.
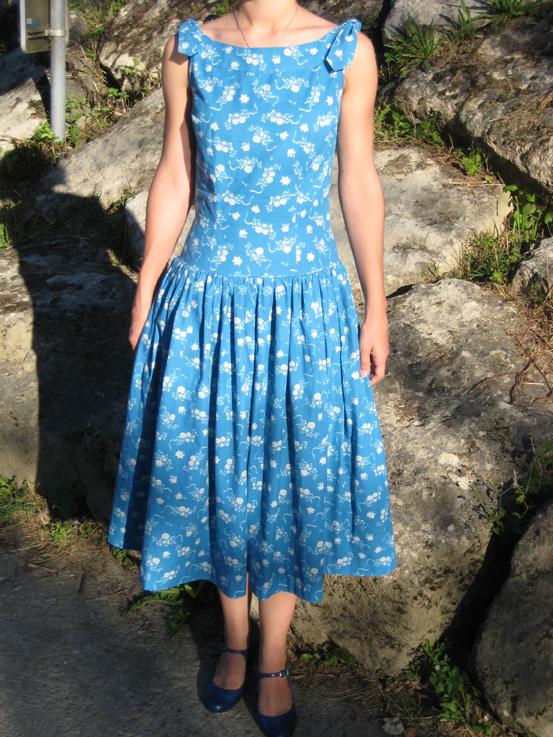
Now let’s talk about the good things! I’m really happy I made this dress. And doing this lead to many first times:- first 50′s dress (and first garment made from a vintage pattern!)- first invisible hem (done with my sewing machine)- first lapped zipper done with my sewing machine- first close-fitting garment (and first time sewing darts)- first gathers done with my sewing machine. I didn’t use a gathering foot to make the whole gathers by machine, but I basted the gathering threads by machine. It was quicker and the gathers are more regular than when I do it by hand!I even used my sewing books four times: for the armhole facings (to do them perfectly), for the zipper, for the invisible hem and for machine gathering. It’s nice to feel you’re making progress.