Vintage inspiration: movie poster

Last Sunday we went to the restaurant with some of my husband’s family and just accross the table, on the wall facing me, was this movie poster:

Of course I couldn’t help but look at it (it’s not like anyone could miss it) and I quite liked the lady’s outfit, which felt like from the early 50s. So after a while I got up and took a picture of it. And I thought I’d share it here with you.

I really like the sleeve shape on her blouse. It was fun because after that we talked about clothes and costume history for a few minutes. And we checked the Internet to see what year the movie was released in: 1952.

As a side note I promess that I’ll share longer posts soon, I have many things to show you, I just have to find a little bit more time to edit my pictures and finish the translations.

50′s dress: photos

Here are the pictures! ^^ We did a little photoshoot last Sunday.

This dress was quite a challenge! First, because I had a firm deadline for it. That’s not a good idea. When you start you’re very confident, thinking you have plenty of time, and then things happen, you realize you have to make a lot of alterations to the pattern, and suddenly you’re late. Because the bad joke was that the pattern is too big! Seems it’s not my size after all. I see several possible reasons: converting my measurements from cms to inches, matching with the closest (but not exact) measurements on the pattern sheet, choosing a vintage pattern rather than a modern one… And now the result is here: it’s too big, and I got several patterns in the same size! Gertie wrote a post on finding the good vintage pattern size (which I saw afterwards…), in which she suggests you use your high bust measurement and not your regular bust measurement. Anyway next time I’ll order one size smaller!

So in the end a lot of changes had to be made: I took in a few cms in the middle of the back and front pieces, at the sides, at the shoulder seams of the yoke… Because of that I had to redraw the armhole, and with no notions of pattern altering it was a little scary. I made a musling of the Simplicity pattern (top of the dress), which seemed okay, but in the end I find that my dress is a tad too big. The waist and hips could be more fitted. I wonder if I did something wrong or if the fit could have been changed by adding the skirt. I saw in another vintage pattern (for a real dress) that they add a grosgrain ribbon as a waist stay, I’ll try that and see if it’s better. Another alteration I did was to change slightly the placement of the side zipper: it’s supposed to be at the bottom of the blouse, but for a dress I thought it would be better to have it at the top, just under the arm. The last thing that happened, which I hadn’t planned, was with the armhole. They say to finish it with bias tape, but it was just impossible for me! I couldn’t turn it around. I had to draw and add shaped facings instead.

Now let’s talk about the good things! I’m really happy I made this dress. And doing this lead to many first times:- first 50′s dress (and first garment made from a vintage pattern!)- first invisible hem (done with my sewing machine)- first lapped zipper done with my sewing machine- first close-fitting garment (and first time sewing darts)- first gathers done with my sewing machine. I didn’t use a gathering foot to make the whole gathers by machine, but I basted the gathering threads by machine. It was quicker and the gathers are more regular than when I do it by hand!I even used my sewing books four times: for the armhole facings (to do them perfectly), for the zipper, for the invisible hem and for machine gathering. It’s nice to feel you’re making progress.

50′s dress

I’m back! Many things happened after my last post that prevented me from sewing as much as I wanted and bloging. Some nice things, like birthdays or friends visiting, and some not as nice, like a cold and headaches (I’ll let you decide where “working late” belongs). But in the end my last project was completed, on time for the wedding it was intended for, which was last Saturday.

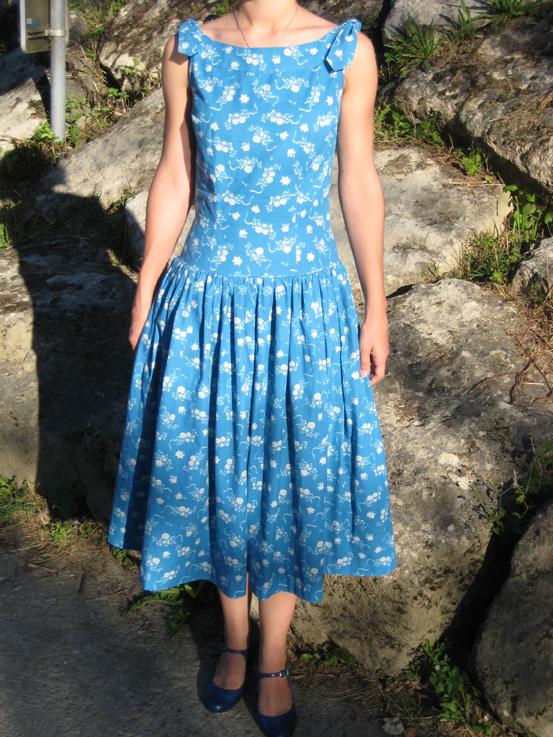
I don’t have nice pictures of the dress on me yet, so this is the only picture you’ll get for now. My challenge was to make a pretty dress from the 50′s. I had decided that for this wedding I’d make my dress myself. And since it had to be nice and elegant (I lile to be dressed up for weddings, in honor of the bride and groom and to make it a special day), I logically turned to the 50′s. To me women clothing of that decade is the most elegant and feminin.

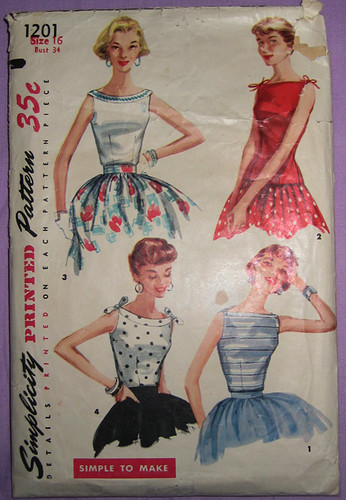
For this dress I used view 4 of the pattern shown in my last post, which is actually a blouse pattern. It’s Simplicity 1201. I’ve had my eyes on it for some time, I like its fitted shape and the different necklines. All variations are really nice. When I found it for sale in what seemed to be my size while I was looking for my dress pattern, I decided to get it and transform it into a dress by adding a skirt.

A few days later while browsing through the pattern pics I saved on my computer I realised there actually was a pattern that was exactly what I wanted to make (picture from the Vintage Pattern Wiki):

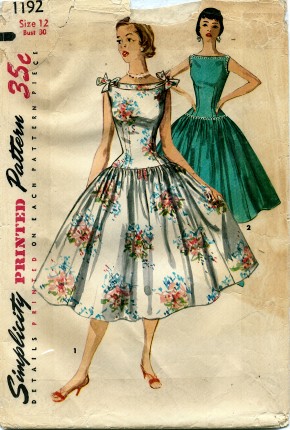
I did a little research online to try to get more information. Camelia Crinoline has this pattern and made the dress, you can find it here. She very kindly answered my questions about the fabrics and measurements.

After that the challenge was to find the right fabric. I was one of the two bridemaids and we wanted to match as well as look ok with the bride without wearing the same color as her (navy). Turns out it’s really not easy to find a nice blue fabric that is not navy, baby blue or turquoize. I finally found this one in Dunkirk, and I’m really happy with it.

I hope to show you more pictures later, along with construction details. In the meantime, if you’re interested in vintage clothes you can go check Sew Retro. It’s a collective blog about vintage sewing.