Old fashioned sewing

Hello,

Tonight I’m sharing a few excerpts from a French vintage sewing book: Initiation à la Couture Familiale (it could translate as “Introduction to home sewing”). It’s actually a series of two books from 1960 and 1961, which were intended as school manuals or for the home sewer which didn’t have the chance to have sewing lessons at school. They were supposed to give girls and young ladies good fundations to sew quality garments. I found them at the Forney library (a specialised library in Paris devoted to craft, fashion, design and such which I adore, lots of interesting books there. Definitely check it out if you live in Paris or nearby!) some time ago. It’s funny to read the foreword now, because we don’t study sewing or any other home related matters in school nowadays, so it seems very dated when really it wasn’t such a long time ago. My mom had sewing lessons at school in the 60s and I didn’t in the 80s. I personnaly think it’s a shame, every boy and girl should learn some basics in sewing, knitting, cooking and such, it would be very useful!

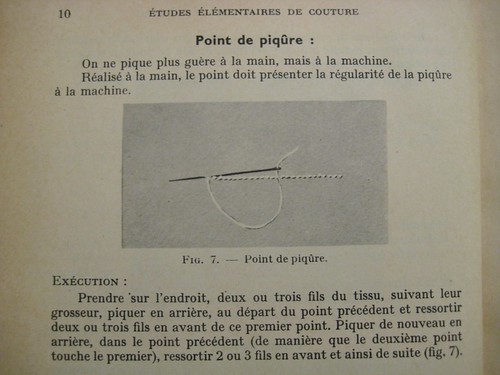
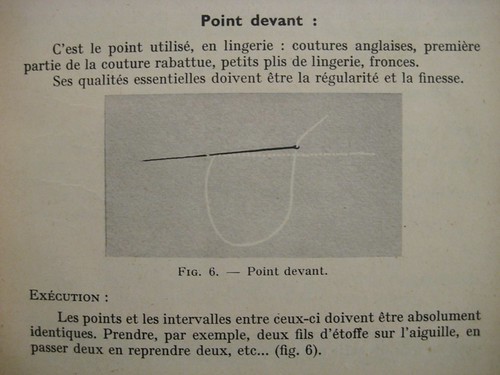
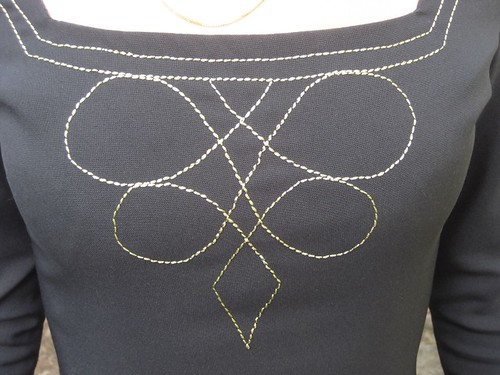
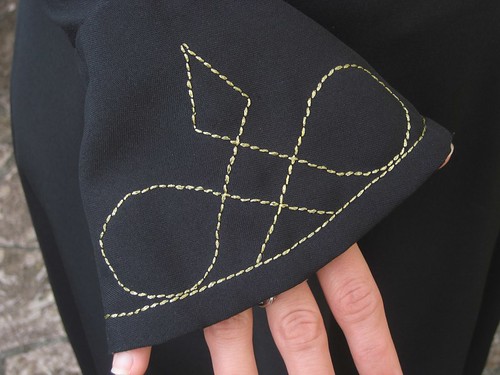
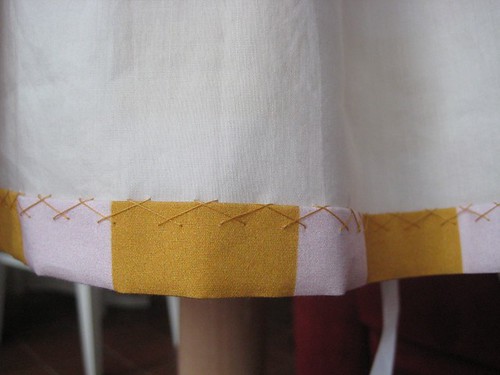
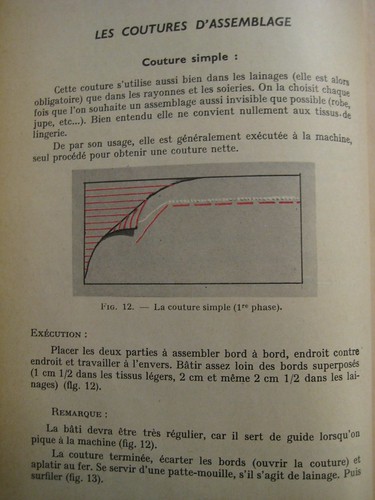
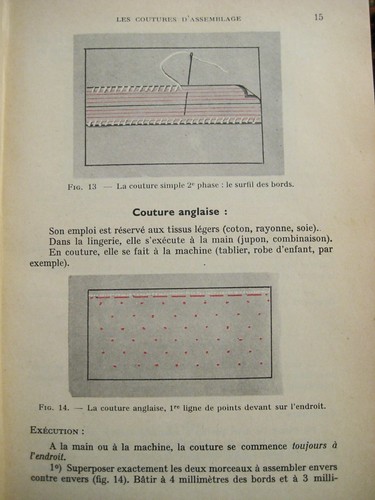
The text I’m showing you here is from the first section of the first book, teaching different kinds of stitches. By the way if you’re able to read French I suggest you read the French version of this article, because it’s a bit more comprehensive. The reason I’m sharing those pages today is because when reading this it struck me as delightfully old-fashioned. About the simple stitch is says that “We no longer stitch by hand, but use a machine”. Who would think it necessary to clarify this nowadays? All the other stitches are explained as hand stitches, and are supposed to be done this way. Including the overcasting stitch. A modern book would explain you to use your machine zigzag stitch or use a serger if you’re lucky enough to have one… They also make a difference between regular clothes and underwear, mentioning when a stich or seam finishing (pictures below) is more adapted to lingerie. I haven’t seen many modern book talking about lingerie stitches or seam finishes, except if they’re devoted to this particular subject. Who wears those fine and fancy petticoats and slips today? A few vintage fashion lovers. I do love slips, I find them very elegant and feminin and useful, and I think they are very pretty objects, but judging from how hard they are to find I guess they are not many of us. And among those, who take the time to sew them?

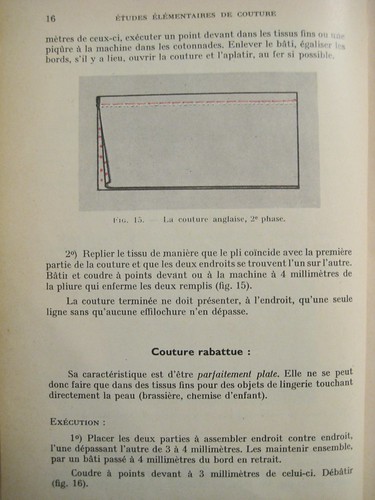
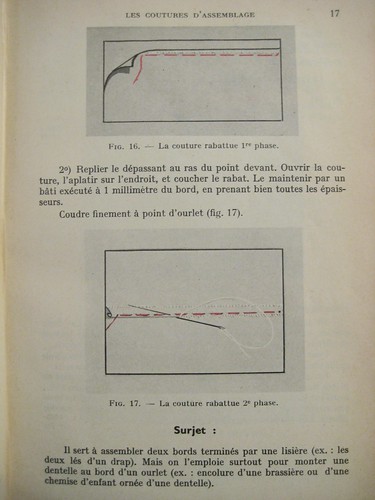
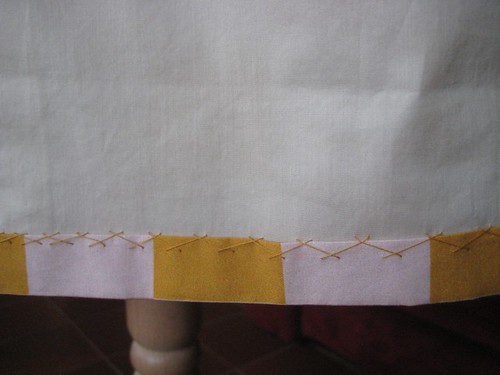
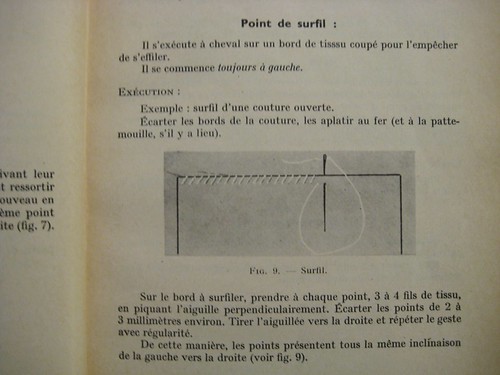
Those pages are from the section describing the different types of seams. There again most of them are made by hand, and they point those that are useful for lingerie. I also like that cotton fabric isn’t the only or even the main fabric mentionned here. I feel like wools, rayon and silks have a more central place.

That said and old-fashionness put aside, those techniques are still totally appropriate today, whether you want to sew by hand or to adapt them to using a sewing machine.

What I’ve been up to for 7 months

Today I want to share with you my biggest sewing project of 2015. Probably even my biggest project ever so far. This is the reason for my disappearance of the Internet at the beginning of the year, which gave me bad blogging habits (aka not blogging). A project with a lot of work and a good level of stress, but also one that makes you learn and progress, and hugely satisfying.

No, I didn’t build a car. This year I made a wedding dress. And not a wedding dress for myself (I already did that), no, one for someone else! My sister in law, or rather at the time my future sister in law as she was my brother in law’s fiancee.

Almost 9 months between the first talks (when it hadn’t been decided yet that I would work on it) and the wedding day, 1 Burda Style magazine, lots of sketches, talks, 3 visits to Paris fabric district, lots of fabric (5 different types), a Pinterest board, several muslins, 6 try-ons (not sure it’s how you call it… when the person tries the muslin to test the design and fit), travels between the North of France and Paris, countless hours of sewing, a few hours of head scratching, a good deal of paper, 6 band-aids, a serger, a sewing machine and some hand sewing, embroidery, many pictures taken, some emails, some plant-based relaxing pills, mistakes, corrections, not a lot of sleep in the end. And after all this, a lovely day, a beautiful bride,a sense of accomplishment from completing this project, the satisfaction of the bride and groom and their families, a wonderful ceremony, a marriage that I wish very happy. And two sisters in law that got a little closer. I think you can say it was worth the work, don’t you? ;)

It’s funny because it’s only the week after the wedding that I realized how huge it was that she trusted me with this. Granted, she’s not the worried type, but still, she didn’t have any second choice just in case, and she never showed event the slightest bit of fright or worry that I wouldn’t finish on time or that she might not like the result. I accepted the challenge, I would be up to it, she trusted me, and that’s it. Quite nice, he?


Of course I’d love to go into more details on the making of this dress, and I hope I will. But knowing how I tend to write long texts and the current frequency of my posts, I thought I’d start by sharing pictures with no technical info. So that you can see it, and I start writing here again, you know, one step at a time. And maybe in the future I can share more technical stuff about this project. In the meantime I hope you’ll enjoy the pictures of this special day. ^^

New page: projects compilation

Just a quick note to let you know about a new page that appeared earlier this year: a yearly overview of my projects. You can find it here : http://anomori.com/blog/?page_id=1601. Each year, towards the end of the year or the beginning of a new one, you see overview posts appear on sewing blogs. I’ve never done it before, but at the beginning of 2015 I felt the urge to do one (even though I noticed fewer of those on the sewing blogs I read ^^; ). I guess with me stopping the sewing lessons I felt the need to look back on the past year and see how it went. I always have the feeling that I’m not sewing that many things, especially compared to some of the bloggers I follow. Since I had never done one of those posts, I had to dig into my archives to find my past projects so that I could compare. And in the end this page listing all the past projects I could remember and find was born!

I will add to it as I post new (or old) projects. It’s fun to see this kind of overview of my past work. Even though it is true that I don’t produce as much as others, I don’t really care about that. But I do care that I don’t produce enough compared to all the list of clothes I imagine in my head. So my goal will be to get better at that: use the fabric I already have (and have projects for) and actually make and finish more projects! This year I’d like to make more clothes in knit fabric, make clothes for my son and start making doll clothes again. I started the year with many projects in mind ! One step at a time, I hope to get closer to achieving them.

What about you? Do you do compilation posts or pages? Do you set goals for the year (or any other period of time) or do you decide on the spot?

Sewn art

This title is a reference to a competition going on at Thread & Needles, a French sewing community (I know, why an English name if it’s a French community? Maybe because the girl who created it was a IT girl? ;p ). This is not my entry for the competition, but an old project that perfectly matched the competition theme. I thought it was a perfect excuse to take new pictures and share it! ;)

This dress was a gift from some of my friends for my 17th birthday. I had no idea at that time that I could learn sewing, but I did love to design and drawn garments. One of my friend’s mother knew how to sew, so there offered to custom make me a dress from one of my drawings. You can guess how happy I was.

The lucky winner was a drawing of a dress inspired by an illustration by Clamp. It’s on the cover of the 2nd Card Captor Sakura art-book. The outfits from this series are really fun and original and I really liked this dress in particular. But since I wasn’t a child anymore and didn’t live in a manga, I had to make some changes.

You can see the resulting dress is longer and simpler. We kept the style of the motifs but simplified them a little bit, as my friend’s mother had to embroider them by hand (I think she wasn’t too happy about it ^^; ). If I were to make it today I wouldn’t choose the same fabric, as it probably has a good deal of synthetic fiber, but it does hang nicely.

This dress was a favorite of mine for a long time, I wore it whenever I wanted to be nicely dresses and feel pretty. I have to admit it had been quite some time since I last wore it though. Putting it back on for the pictures made me want to wear it again. Sadly it’s a little bit tight around the arms now… I might try to let out the seams a bit and see if it solves the problem.


70′s dress from a japanese pattern

Do not forget the giveaway for La Modette’s fabric store, you have until tomorrow 10pm Paris time to enter (that’s 1pm pacific time I think)!

This dress was made a few year ago (I was still living in Japan!) and was never shown here, but I love it and with summer coming it’s a good time to finally share it. This project was born because we were invited to a “disco” themed party, which was a perfect excuse to finally make of those long and flowy dresses from the 70′s that I love. I browsed the web for inspiration (no Pinterest at the time, I had to save the pictures on my computer ;p ) and fell in love with this pattern drawing: McCall’s 4399.

I didn’t want to order a pattern, so the plan was to make a dress similar to the maxi shown on the cover, using a pattern I already owned as a base. I didn’t have any vintage pattern at the time in my collection. Instead I turned to my collection of japanese pattern books, and found that the top of the I dress from the Stylish Dress Book had a similar top that I could use.

I used a picture from the envelope back as my guide for fabric requirements and the overall shape of each pattern piece and I went modifying my pattern to get the dress I wanted. In the end only the shoulders and armholes of the original pattern remain untouched. XD I changed the neckline to lower it and added lots of length to the top. The original pattern has a seam under the bust with a gathered skirt, mine doesn’t have any horizontal seam. However there are seams down the center front and center back since the botom of the dress was to wide for my fabric width. I was planning to add sleeves, but left them of at the last minute because of a lack of time. I did like the dress as it was so I left it like this.

I used a floral cotton fabric that wasn’t probably the best choice in terms of thickness and drape (it probably is light quilting cotton) but that I thought was nice in terms of print. Plus I didn’t have much time so I had to do with what I could find around me. Because of that fabric it might not be as flowy as it could be, and it’s not as light as I wished it was during very hot summer days, but I wear it all the same. I wear it every summer since I made it. For the neckline ribbon the pattern calls for “stretch lace or foldover flexi-lace”. I couldn’t find any so I used a sort of gauzy ribbon. Since it couldn’t follow the round neckline at the back I slightly gathered it. Now I think it wasn’t the best idea, but I’m too lazy to change that… ^^; If I make it again I’ll probably cut a fabric band the same shape of the dress neckline (kind of like a facing).

The funny thing is that this particular pattern is for a maternity dress. Of course I wasn’t pregnant at the time but I didn’t mind and I don’t think the resulting dress screams “maternity”. But I was super happy to have it when I was indeed pregnant last year. :) It was indeed perfect, as you can see in the following pictures.

Overall I’m quite happy with this dress. I love that it is quite comfortable because of the tent shape (I can even tie the ribbon at the front to remove the empire waist) but still feels feminin. Sure it has flaws but at the time I made it I didn’t have that much sewing experience and I was super proud to be able to make it by altering another pattern. :) It’s quite nice to wear. I’ll probably make other(s) in the same style, either maxi length like this or shorter.

Firsts I remember for this project:

  • first vintage style garment
  • first time hacking a pattern

1916 dress project

Summer approaches, and with it the end of my sewing lessons. Realizing that, I started a project last week that has been in my mind for some time, and was delayed by my pregnancy: making a dress from a 1916 magazine’s pattern. There are many unknowns in this project, which might turn out very easy or, as I suspect, quite challenging. That’s why I want to use the remaining lessons to start it with an experienced seamstress beside me. And I hope to share the process here with you. :)

The magazine is La Mode Illustrée from January 1916. It was published during the war and you can feel it when you read the front page article, which talks about lifestyle changes: reducing costs, having less employees, even women looking for a job! It seems a little bit strange to read this nowadays. I like reading those old magazines, they give you an insight at what life was for some people in those days. The dress I’m interested in is shown on the “afternoon dresses” page and described as a dress of broadcloth and velvet (I think, not 100% of my translation here). In the description they write that this dress was designed so that an older dress in a narrower style could be used to make it, lengthening the velvet band at the bottom if needed.

What do you think of this dress? Would you wear it? I do find it really promising, it looks nice and elegant. And although I think the journey in itself will probably be interesting, I do hope to have a wearable garment at the end of it. I fear I might have to make quite a lot of alterations: I doubt my measurements match those of the average women of that time, and they probably wore corsets under their clothes, which I’m not going to do on a daily basis. I actually prefer to wear my corsets on the outside. I couldn’t find any measurements on the magazine or the pattern sheet, so I have no idea what size this thing is supposed to turn out. It will be a surprise. ;)

Checker skirt

The project I’m showing today is quite special: I got the opportunity to test one of the first fabrics produced by french designer La Modette. :) I was so happy when Sandrine told me that I would be part of the first round of testers for her new fabrics! She liked the fabric I had picked and the project I suggested.  It’s the first time I take part in something like this, it was exciting but also a little bit stressful. It felt like such a huge decision when I started cutting into the fabric to make something out of it. ^^;

First fabrics from La Modette

As you can see from the above picture (taken from La Modette’s facebook page with Sandrine’s permission), all fabrics from this first batch are really nice and colorful. I thought for a moment of making something with this umbrella print (cause umbrellas are fun and I still can’t forgive myself for not getting some of Alexander Henry’s April Showers print), but in the end I decided to stick with the checker print (which you can see better here) that had first caught my eye. Since I don’t have much available time lately (perhaps you’ve noticed?) I knew a simple project would be best. I thought I could make another skirt similar to my brown skirt with the lace print. It has few sewing lines and it’s based on rectangles, which would work well with that kind of print, and it’s a skirt I wear quite often so I’d probably make good use of another one in the same style.

I realized it wouldn’t be so easy when I measured the fabric after washing it. I also measured my original skirt and here is how it went: my skirt has two 52×99 cm panels (not counting the seam allowances) and my fabric was 94x155cm. They was no way I could cut two panels high and large enough to make the same skirt. Since I didn’t want to chance the skirt shape, my only option was either to mix fabrics (I’m sure it would be nice mixed with a plain black) or patch smaller panels together to create the length I needed. I figured the skirt would be easier to coordinate if I didn’t add yet another color to it, so I went for the latter.

Une jupe puzzle...

Technical details:

  • I cut a first rectangle of 52 (+ sewing allowances) x 155cm, and made a second one measuring 52 x 50cm (+ allowances) by sewing together two smaller rectangles of 26 x 50cm (+ allowances). As a result 3/4 of the skirt don’t have any seams, and the last quarter has two vertical seams and an horizontal one around the middle. I did my best to sew on the squares to hide the seaming.
  • as the fabric is rather light I was concerned about show through so I decided to line the skirt in a very soft cotton fabric (maybe a blend?) I’ve had for some time. Maybe it wasn’t necessary, but it had the added benefit of providing another layer to catchstitch the hem to, so that I wouldn’t have any hem stitch showing on the right side.
  • the waistband is a simple 6cm height band folded and sewn with 1cm seam allowances, for an elastic band that was 1,5cm large. It was a little tight for the elastic but I think it may have to do with me not reducing my allowances after sewing.

Nice invisible hemA nice hem without any stitches showing on the outside

So what about the fabric? As a tester I have to give my opinion about it (although it’s probably easier to review a pattern…). I found it nice and easy to use and found the colors to be really nice in real life too (at first on my computer I thought the light squares were white but they’re a sort of pale salmon pink). It creases normally for a cotton poplin. I prewashed it at 30°C, Sandrine says we can even wash it at 40°C. The colors didn’t fade or bleed. It seems the fabric shrank a little bit in the direction parallel to the selvage: the squares are supposed to be 4cm by 4cm according to the website, but mine were a tiny bit less high. The fabric doesn’t fray much. There was a tiny flaw in the print in one place, but I guess it happens sometimes. Unfortunately I saw it after I had already cut my pieces, but I managed to hide part of it by moving a seam a little bit and I don’t think it’s really noticeable on the skirt.

The good:

  • it was a great opportunity to take part in a nice project, test new fabrics, and promote and support a French creative woman.
  • the resulting skirt is fresh and cheerful.
  • I succeeded in getting the skirt I had planned, which has the right size, even if it seemed at first that I didn’t have enough fabric. It was an interesting challenge. The easy to match and regular motif clearly helped.
  • The motifs match almost perfectly at the seams.
  • I’m really proud of my catchstitched hem. I’m quite lazy usually when it comes to hand hemming, but I felt it would be a shame to ruin the lovely check motif with visible stitches. My stitches aren’t perfect, they’re still not quite regular, but it could have been worse, I’m getting better. It’s funny because they vary a lot in size at the beginning: first they were tiny as I was hesitant, and then as I got scared that it would take forever they got huge. XD After that I decided to be more focused and they got better.
  • The lining is super soft on my legs it’s a pleasure. :)

Isn't it nice?First stitches...First stitches: from tiny to huge

The not so good: I’m not entirely sure I made the best choices…

  • I should have cut to rectangles of 47cm by 102cm and add a band at the bottom rather that cut the right length and add a vertical band with a seam in the middle of it. It’s not balanced and even if the checks match from up close you can see the seams. And I’m afraid if might alter the way the skirt hangs.
  • I feel like the waist on this skirt is thicker than on my brown skirt. It’s probably because of the added lining and the fact that I didn’t cut the allowances.

Can you spot the seams?

Mr Robots says he really likes this skirt, which he finds fresh, and he thinks it fits me well. I’m wearing it right now with a black tank top. The top is fitted so it’s hiding the elasticized waistband and makes the skirt flares a little bit more under it, it looks nice. I think it looks better like this than with the shorter top I used for my outdoor picture. And it made me think of another use for this fabric: a dress in the 20′s style, in black, with a flounce in this fabric at the bottom. What do you think, would it be nice ?

I still have a little bit of fabric that I’m keeping for the perfect use. I’m even thinking about getting more of this same print in the same colors to try another idea or two that I had during this project. So maybe you’ll see more checks here soon? What about you? Will you fall into check love (this fabric is available in several colorways)? What would you make with such fabric?

Wedding part 2: my outfit

There are people who are still interested in seeing pictures of my wedding outfit, and that makes me happy, so here they come! It was high time I shared those, almost two years after the event… First I’d like to show you my inspiration mosaic again (with links to the original pages when I have them):

First raw: Heritage of Scotland, my picture, Flickr, my picture (Juliette et Justine skirt), Heritage of Scotland
Second raw: Etsy, Truly Victorian, Heritage of Scotland, Clockwork Couture
Third raw: Tumblr, Tumblr, robotvsbadger.com, Recollections, Walk in wardrobe, Urban Threads
Fourth raw: Uptight Clothing, Recollections, ??, Tumblr (Alexander McQueen F/W 2006-2007), Steampunk Couture
Fifth raw: Recollections, Tumblr, padmitasmakeup.blogspot.com, Atelier Volute, Etsy, Heritage of Scotland

And here are some of the sketches I made during the design part, when I was trying to find out what I wanted. None of them is the exact sketch of my outfit, but they inspired me, allowed me to test ideas and to communicate better with the other people involved. Some details should have made it into the final outfit but didn’t due to a lack of time or a lack of skills (or both, my lack of experience causing me to hesitate for too long).

And finally, here is what I looked like on our wedding day, with all the outfit pieces worn together.

The outfit was composed of:

  • a sleeveless top with a sweetheart neckline made from a plaid cotton (Scottish wedding dresses inspiration), that I made myself from a highly modified 50′s pattern.
  • underbust victorian style corset made of silk by Volute (sadly they’re not in business anymore…). I did the embroidery on the front panels myself.
  • a long skirt made in a very nice olive green heavy satin fabric (it’s a mix of silk and rayon) that I sewed myself. The shape is inspired by the skirts of around 1895.
  • an overskirt of bright green silk made by the people at Volute. The shape is a result of a mix of inspirations from different time periods: gothic skirts I own, bustle skirts from the 19th century, a drawing from 1890… The back can be let out to form a train or arranged in bustles with the help of three ribbons sewn inside.

Those are the main pieces, that we made especially for the wedding. They were accessorized with the following:

  • a petticoat bought on Ebay and modified to get the shape I wanted.
  • a nice dark green cardigan that I’ve had for some time and really like.
  • since it was cold, a cream colored handmade shawl I got on Ebay. What’s fun is that it was originally handmade for a wedding by the seller, and she decided to part with it after it wasn’t of any use to her. It’s a nice cycle.
  • and for the really cold times, I wore my black wool cape on top of all this (yes I know, not the best color to complement my outfit, but I did with what I had on hand). I got that cape for my 18th birthday and it’s quite special to me.

I had planned a second overskirt (to be worn between the bright green one and my skirt) in the same plaid fabric as the top, and a high-collared lace top to wear under the sleeveless one (to remind a little bit of victorian collars). But due to my slowness and my legendary talent for procrastination, they didn’t happen. Plus the lace top was scaring me a little, it wasn’t a project to tackle as the same time as the rest of my outfit and wedding organization, I was anxious enough without trying to figure out how to make it. But in the end I loved my wedding outfit as it was. I felt beautiful and most of all, I felt like myself! And that was the point of all this in the first place. My dear husband reacted the way I was hoping when he first looked at me, he loved my outfit, and I also got very nice comments about my outfit from our guests (and Mr Robot also, but I didn’t have any part in the sewing of his outfit). And maybe one day I’ll find the motivation and an excuse to make the missing pieces (for a belated “trash the dress” photo session that we couldn’t make at the time?).

Bonus point of this modular design: it wasn’t a one time only outfit. Being able to wear it several times was one of my initial goals and I’m happy to say that it has been fulfilled. The top I wear quite often when the weather is nice enough, the corset has been worn regularly (even to work!), and I wore the skirt once for a date with my husband. I’d wear it more often as I love its shape and color, but due to its length and the fibers it isn’t the most practical piece of clothing I own. I’m thinking of making a similar skirt in cotton. The only piece that hasn’t been reused is the overskirt, but I’m sure it will happen some day. In the end the outfit cost me more than what I was planning to spend at the beginning, but at least for that price I got custom made, designed by me, in beautiful fabrics that I liked (no ugly synthetic fibers!), so I guess it’s okay. ^^

My new t-shirt

Tonight I’m going to share a project that’s quite popular on the French sewing blogs right now: a Plantain tee. It’s a free pattern released by Deer and Doe earlier this month. It’s not a shape I usually wear but I was curious and the challenge organized by Eleonore (owner of Deer and Doe) gave me the motivation I needed to try it.

I wanted to make it into a dress for the challenge, but was afraid to start the dress without making a test garment first (my measurements have changed since my pregnancy and I’m not used to D&D’s sizing), so this t-shirt came to life. I used remaining fabric from my pregnancy top. I didn’t have much fabric left and had to make the short sleeved version. I made it in size 38 without any pattern modifications (it fits in about 80cm of fabric if I remember correctly). I did reduce the hems though: I made them 1.5cm at the bottom and about 0.7cm at the sleeves, wich make the top and sleeves slightly longer.

I was very pleasantly surprised by this top when I tried it on: I found it lovely and more flattering than I thought it would be. Plus in this drapey fabric it’s very nice to wear. I couldn’t take pictures without another top under it because it’s cold right now, but I’ll try to take some as soon as possible to better show the nice neckline. I’m sure this baby will have brothers and sisters, especially since I’m now the happy owner of a serger (birthday present from my friends and family, thank you so much!). It made sewing this top a real pleasure. I couldn’t start working on it before last Sunday because of a sick Mr E. and a lack of ink in my printer, but I still managed to finish it yesterday. Yay for a quick and rewarding project (yes, that’s a quick make for me)!

At the last minute I decided to cut the neck band off grain to play with the stripes. I’m really happy I did it! I love the result and already got nice comments about it. Small details like this can make a difference. I changed the construction steps for the sleeves. The pattern has you sew them flat and then sew the sleeves bottom and the top sides in one go. Since I wanted to test the fit early on I sewed the shoulders, then the side seams, tried the top (it was okay), and then sewed the sleeves closed and set them in.

The contest ends tonight so my dress won’t be made on time, but I’m still happy that it made me discover this nice pattern. I really recommend it! And since all Deer and Doe patterns come in both French and English, you have no excuse not to try it. ;)

Project firsts:

  • first garment entirely sewn with a serger and coverstitch machine. I have to say that I was quite pleased of this and rather proud of my little t-shirt, as a knit fabrics beginner.
  • first jersey neck band
  • first Deer and Doe pattern
  • first time sewing with my own serger!

The positive:

  • the stripes almost match at the side seams! See above and below. Okay, so maybe I shouldn’t be happy that they almost match, but considering that I didn’t make it a priority, it’s a nice result. I didn’t spend much time on this but tried to place my pattern pieces roughly at the same level when I cut my fabric. The left side is quite nice. The right side only matches at the top, the bottom being totally off. I say it’s a good result/time ratio.
  • I discovered a very nice pattern (and some people who saw my tee might try it also)
  • I have a nice top to wear
  • the serged seams look nice
  • I used fabric and thread from my stash

The negative:

  • I’m note as comfortable with the coverstitch machine we have at my sewing lessons as with my serger, I’m not very happy with how my hems look. Luckily you don’t see them too much on this busy fabric. I have to practice more!

First jersey piece

As promised here are a few pictures of my new top taken during our holidays. Looking at them makes me want to go back, it was so nice to enjoy the sea for a week and not have to worry about anything. It was the best way to start my maternity leave and forget about work.

This top is actually quite simple, but it was my first piece made of jersey fabric, so it feels like an achievement. I’d been afraid of knit fabrics and had been avoiding them, except for the occasional dolly piece that I would sew by hand. That’s why I had made it one of my goals for this year’s sewing courses to start sewing with knits. At the beginning of June I realized I had very few time left to achieve this, since the lessons would end soon, so I stopped the project I was working on, went to a cheap fabric store in Paris to get a nice looking but inexpensive jersey and then went looking for an appropriate pattern in my Burda magazine collection. Since I didn’t have much time and because of my jersey fear I wanted something quick and simple. And if possible something that could accomodate my big belly. I settled on the 123-A top from Burda 2013/01.

If you’re considering making this top, please know that it’s quite large and long! I expected it, but not that much. I traced the pattern according to my maternity bust measurement, which is one size bigger than my regular size. But I think my regular size would have accomodated my 8 month pregnant belly without any problem! The top body is straigt so it’s quite roomy. Also the sleeve opening is quite large and low, so if you’re not wearing anything underneath your bra band will show when you lift your arms. Lately it’s been too hot in Paris for me to mind, but it’s not something I usually like.

This top was quite easy to sew, it makes me wonder why I waited so long to sew with knits! That said it’s a pretty forgiving project, since it’s very simple and not fitted. I started sewing it using the serger we have in the sewing class, and since I couldn’t complete it before the lessons ended I finished on my regular sewing machine, using its elastic stitches. And you know what? Everything went ok! The stitches might not be as nice looking as if I had used the serger all along, but it worked and my seams are stretchy and not too bad looking so it’s fine with me. I even used a twin needle to hem the bottom. It’s a little bit wavy, I don’t know if it’s because of the needle or the stitch settings. But with the busy fabric you don’t see it that much when I’m wearing the t-shirt.

I was very careful when cutting my fabric to have it laying properly, so that the stripes wouldn’t be wonky, but I didn’t think about matching them at the sides… ^^; I guess I’ll do better next time. The intructions called for Vlieseline stabilmanche to stabilize the back neckline, shoulders and sleeve opening. Since I didn’t have any my teacher suggested I cut small bands in a bias tape and used those as stabilizers. It made the back neckline a tad too thick and rigid with all the layers, but it’s okay. I didn’t use any stabilizer on the sleeve openings though for fear they wouldn’t hang properly. Below is a picture of how the shoulder seams look like with the bias strip stabilizer.

So here it is, my first knit project! I feel more confident in using jersey now and would love to try other patterns. I’d like to make some fitted garments, which are more my style. But it’ll have to wait until I have the time. With all the things we had to do in the house to prepare for the baby’s arrival I’m only now finding the time to sew, and there are some more urgent things in my to-do list, like things for the baby for example. ^^ He might arrive any day now, I’d like to make a few things before that…